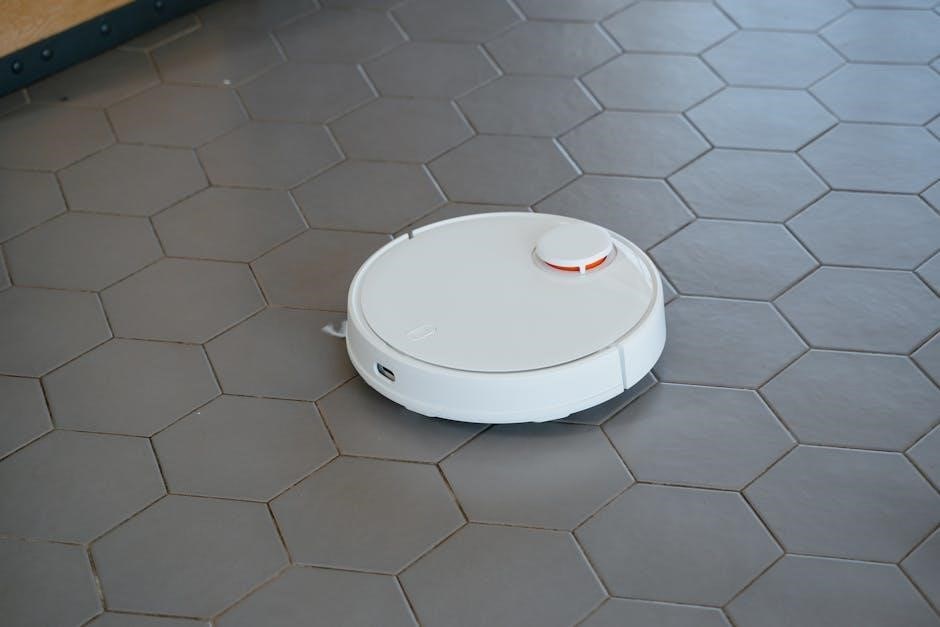
The Shark robot vacuum is a cutting-edge cleaning solution, combining innovative navigation, powerful suction, and Wi-Fi connectivity for efficient home maintenance. Designed for pet owners and allergy sufferers, it offers advanced features like self-emptying bases and voice control through smart home systems. This manual guides users through setup, operation, and maintenance to ensure optimal performance and longevity of their device.
Product Overview
The Shark robot vacuum is a sleek, advanced cleaning solution designed for efficient home maintenance. Models like the Shark AI ULTRA Robot and IQ Robot RV1001AE feature powerful suction, capturing dirt, debris, and pet hair from carpets and hard floors. Equipped with Matrix Clean Navigation, these robots ensure thorough coverage, while self-emptying bases offer convenience. Compatible with voice assistants like Alexa and Google Assistant, they integrate seamlessly into smart homes. The robots include side brushes for edge cleaning and washable filters for long-term use. With Wi-Fi connectivity, users can customize cleaning modes and set no-go zones via the SharkClean app. Included accessories enhance functionality, ensuring optimal performance and ease of use.
Design and Features
The Shark robot vacuum features a compact, slim design, allowing it to navigate seamlessly under furniture and around obstacles. Its robust construction includes a self-cleaning brush roll, which prevents hair tangles and ensures consistent cleaning performance. Advanced sensors enable precise navigation, avoiding stairs and detecting surface types. The vacuum incorporates Matrix Clean Navigation, ensuring methodical coverage of spaces. Voice control compatibility with Alexa and Google Assistant enhances user convenience. Additional features like washable filters and a high-capacity dustbin minimize maintenance needs. The Shark robot vacuum is engineered for reliability, offering quiet operation and extended battery life, making it suitable for various home environments and cleaning requirements.
Included Accessories
The Shark robot vacuum comes with a comprehensive set of accessories to enhance functionality and maintenance. Included is a charging dock, ensuring convenient battery replenishment. Side brushes are provided for effective edge and corner cleaning. A washable filter is incorporated to maintain optimal suction power. Additionally, the SharkClean app offers remote control and scheduling capabilities. The package also includes a user manual, detailing setup and operation guidance. These accessories collectively ensure a seamless and efficient cleaning experience, catering to various household needs. The vacuum is designed to be user-friendly, with accessories that simplify maintenance and maximize performance.
Installation and Setup
The Shark robot vacuum offers a straightforward installation and setup process. Charge the battery fully before first use, then position the docking station on a level surface. Follow in-app instructions to connect to Wi-Fi and enable voice control for seamless integration with smart home systems. Initial setup includes activating voice commands and configuring cleaning schedules. Ensure the robot is properly aligned with the base for optimal charging and operation. A well-executed setup ensures efficient performance and hassle-free cleaning experiences.
Unboxing and Preparing the Robot
Carefully unpack the Shark robot vacuum and all included accessories, such as the charging dock, power cord, and filters. Inspect for any damage. Before first use, fully charge the robot by placing it on the docking station. Ensure the docking station is positioned on a level, stable surface, away from direct sunlight and obstacles. Remove any protective packaging from the robot and accessories. Familiarize yourself with the robot’s components, such as the dustbin, brush roll, and sensors. Charge the robot for up to 6 hours before initial use. Once charged, the robot is ready for setup and configuration. Always refer to the manual for specific unboxing instructions.
Charging the Battery
To charge the Shark robot vacuum, place it on the included docking station, ensuring proper alignment with the charging contacts. The charging process typically takes 4-6 hours for a full charge. Use only the original power adapter to ensure safety and compatibility. The robot will indicate charging status through LED lights, with a steady light signifying a full charge. Avoid interrupting the charging cycle. If the robot has a self-emptying base, charging still occurs while docked. Always follow the manual’s guidelines to prevent overcharging or damage. Keep the docking station on a level surface and avoid blocking the charging contacts to maintain optimal battery performance. Regular charging ensures reliable operation and extended lifespan of the battery.
Initial Setup and Configuration
To begin, power on the Shark robot vacuum by holding the CLEAN button for 5-7 seconds until the LED lights activate. Ensure the robot is fully charged before first use, which may take up to 6 hours. Once charged, download and install the SharkClean app to configure your robot. Follow in-app instructions to connect the robot to your Wi-Fi network, ensuring your phone is connected to a 2.4 GHz network. Complete the setup by naming your robot and reviewing the quick start guide within the app. If connectivity issues arise, restart your router and robot, then retry the connection process. Proper setup ensures seamless operation and access to advanced features.
Setting Up Voice Control
To enable voice control for your Shark robot vacuum, start by downloading the SharkClean app and ensuring your robot is connected to Wi-Fi. For Amazon Alexa users, search for the Shark Skill in the Alexa app, enable it, and link your Shark account. You can then use voice commands like, “Alexa, ask Shark to start cleaning.” For Google Assistant, link your Shark account through the Google Home app and use commands such as, “Hey Google, start vacuuming.” Once configured, you can control your robot hands-free, scheduling cleanings or stopping the device with simple voice instructions. This feature enhances convenience and integrates seamlessly with your smart home system.
Operating the Shark Robot Vacuum
The Shark robot vacuum offers seamless operation with features like one-touch cleaning, scheduled cleanings, and advanced navigation. Use the SharkClean app to monitor and control your device.
Understanding the Controls
The Shark robot vacuum features an intuitive control panel with a CLEAN button to power on/off and start cleaning. Additional buttons allow you to send the robot to its dock or adjust cleaning modes. Indicator lights provide status updates, such as battery level, error codes, or when the robot is charging. Voice control via Amazon Alexa or Google Assistant enables hands-free operation. The SharkClean app offers remote access to customize settings, view cleaning maps, and schedule sessions. Familiarizing yourself with these controls ensures smooth operation and maximizes your cleaning experience. Regularly check the app for firmware updates to maintain optimal performance.
Starting a Cleaning Cycle
To initiate a cleaning cycle, press and hold the CLEAN button on the robot for 5-7 seconds until it powers on. Choose your preferred mode using the control panel or the SharkClean app. Voice commands via Alexa or Google Assistant offer hands-free operation. Ensure the robot is fully charged and placed on a level surface. Clear any obstacles to ensure uninterrupted cleaning. Use the app to schedule sessions, select specific areas, or adjust settings for a tailored experience. Regular checks ensure optimal performance and customizable cleaning sessions.
Navigation and Mapping Technology
The Shark robot vacuum employs advanced navigation and mapping technology to ensure thorough and efficient cleaning. Using sensors, it detects obstacles and avoids hazards like stairs or ledges. The Matrix Clean Navigation feature enables methodical cleaning patterns, covering multiple passes to leave no area untouched. Voice control integration allows seamless command execution, while Wi-Fi connectivity enables remote operation. The robot’s mapping capabilities adapt to various floor plans, ensuring comprehensive coverage. This technology enhances cleaning precision, reduces missed spots, and optimizes runtime. Regular updates improve performance, making it a reliable choice for maintaining a spotless home.
Scheduling Cleanings
Scheduling cleanings with your Shark robot vacuum is straightforward and convenient. Using the SharkClean app, you can set up a cleaning schedule that suits your lifestyle. Simply open the app, navigate to the schedule section, and choose the desired time and frequency for cleanings. The robot will automatically start cleaning at the scheduled times, ensuring your home stays tidy. For added flexibility, you can customize cleaning modes or adjust schedules as needed. Voice control integration allows you to initiate or modify schedules hands-free. This feature is especially useful for maintaining a consistent cleaning routine, even when you’re not at home.

Maintenance and Care
Regular maintenance ensures your Shark robot vacuum performs optimally. Empty the dustbin, clean filters, check the brush roll for hair, and ensure sensors and wheels are debris-free. Use authentic Shark replacement parts.
Emptying the Dustbin
To maintain optimal performance, empty the Shark robot vacuum’s dustbin regularly. Turn off the power before starting maintenance. Press the release button on the dustbin, located on the side or back, and pull it out. Hold the dustbin over a trash can and press the empty button or manually discard the contents. For models with a self-emptying base, the robot automatically transfers debris to the base dustbin, which holds up to 60 days of dirt. After emptying, wipe the dustbin with a soft cloth and ensure it’s securely reattached. Regular cleaning prevents dust buildup and ensures efficient suction. Always refer to the manual for specific instructions.
Cleaning and Replacing Filters
Regularly cleaning and replacing the filters in your Shark robot vacuum is essential for maintaining its suction power and performance. Locate the filter, typically found in the dustbin or under the robot. Gently tap the filter over a trash can to remove loose debris. For deeper cleaning, rinse with water if specified in your manual. Allow it to dry completely before reinstalling. Replace the filter every 1-3 months or as indicated by the SharkClean app. Refer to your specific model’s manual for exact instructions, as filter locations and types may vary. Clean filters ensure efficient cleaning and prevent dust and allergens from recirculating.
Cleaning the Brush Roll
To maintain optimal performance, regularly clean the Shark robot vacuum’s brush roll. Turn off the device and remove any tangled hair or debris using scissors or your hands. For stubborn tangles, detach the brush roll as per the manual. Wipe it with a soft cloth or rinse under warm water if allowed. Ensure it’s completely dry before reattaching. A clean brush roll prevents clogs and ensures effective cleaning. Check and clean it after each use, especially if you have pets, to keep your robot running smoothly and efficiently. Regular maintenance extends the life of your Shark robot vacuum.
Cleaning Sensors and Charging Contacts
Regularly clean the sensors and charging contacts to ensure proper navigation and charging. Use a dry cloth to gently wipe the sensors on the bottom of the robot and the charging contacts on both the robot and the base. Avoid using liquids or harsh chemicals, as they may damage the components. Cleaning these areas helps maintain accurate navigation, prevents charging issues, and keeps your Shark robot vacuum functioning optimally. Perform this maintenance every 1-2 months or when you notice decreased performance. This simple step ensures your robot continues to clean efficiently and reliably. Always turn off the robot before cleaning for safety.
Checking and Replacing Wheels
Regularly inspect the wheels of your Shark robot vacuum to ensure smooth navigation. Check for blockages, such as tangled hair or debris, and clean them gently with a soft brush or cloth. If a wheel is damaged or worn out, it may need replacement. To replace a wheel, flip the robot over and remove the screws securing the damaged wheel. Carefully pull it off and install the new one, ensuring it is properly aligned and secured. Replace any worn wheels promptly to maintain effective movement and prevent further damage. Regular maintenance ensures optimal performance and extends the lifespan of your robot vacuum.

Troubleshooting Common Issues
Identify and resolve common issues like error codes, connectivity problems, or physical obstructions. Refer to the manual for specific solutions to ensure optimal performance and functionality.
Common Error Codes
The Shark robot vacuum may display error codes to indicate specific issues. Error codes like “Error 6” often relate to the front bumper or base alignment problems. Other codes may signal connectivity issues, low battery, or sensor malfunctions. Refer to the manual for a detailed list of error codes and their meanings. To resolve many issues, restart the robot, ensure the bumper moves freely, and check base connections. For persistent problems, consult the troubleshooting section or contact customer support. Regular maintenance, such as cleaning sensors and updating software, can help prevent errors and ensure smooth operation. Always follow the manual’s guidance for optimal performance.
Resetting the Robot
To reset the Shark robot vacuum, press and hold the CLEAN button for 10-15 seconds until the lights flash. This resets the robot to factory settings. Resetting is useful if the robot is experiencing connectivity issues or recurring errors. After resetting, the robot will clear its schedule and settings, requiring you to reconfigure preferences. Ensure the robot is fully charged before resetting. For persistent issues, refer to the troubleshooting guide in the manual. Resetting is a simple yet effective solution to restore your robot to optimal functioning. Always follow the manual’s instructions for proper reset procedures. This ensures your device operates efficiently after the reset.
Resolving Connectivity Issues
If your Shark robot vacuum experiences connectivity issues, ensure your Wi-Fi network is stable and compatible (2.4 GHz is recommended). Restart your router and robot, then check the SharkClean app settings. Verify that your device is connected to the same network as the robot. If issues persist, reset the robot by holding the CLEAN button for 10 seconds and re-pair it through the app. Ensure the app is updated and permissions are enabled. For voice control issues, disable and re-enable the Shark Skill in your smart home system. If problems continue, refer to the troubleshooting section in your manual for advanced solutions.
Advanced Features
The Shark robot vacuum offers advanced features like self-emptying bases, voice control via Alexa or Google Assistant, custom cleaning modes, and smart navigation with mapping technology for optimized cleaning paths.
Customizing Cleaning Modes
The Shark robot vacuum allows users to customize cleaning modes to suit their preferences. Through the SharkClean app, you can select from multiple cleaning modes such as Eco, Normal, and Ultra, each offering different suction power levels. Eco mode is ideal for quiet operation and lighter cleaning, while Ultra mode provides maximum suction for deep cleaning. Additionally, you can schedule cleanings, set no-go zones, and adjust cleaning patterns to ensure a tailored experience. The app also enables voice control via Amazon Alexa or Google Assistant, allowing you to start or pause cleanings hands-free. Customization options ensure efficient and personalized cleaning for your home.
Setting Up No-Go Zones
Setting up no-go zones on your Shark robot vacuum ensures it avoids specific areas, protecting delicate items or sensitive spaces. Using the SharkClean app, you can digitally map these zones, preventing the robot from entering them during cleaning cycles. This feature enhances efficiency by focusing on accessible areas and reduces the risk of damage to fragile objects. To set up no-go zones, open the app, select the mapping option, and outline the restricted spaces. The robot will automatically adapt its navigation to avoid these zones, providing a more tailored and effective cleaning experience. This feature is particularly useful for homes with pets, plants, or valuable items that require protection.
Using the SharkClean App
The SharkClean app is your gateway to advanced control and customization of your Shark robot vacuum. Download and install the app from the App Store or Google Play, then connect it to your robot via Wi-Fi. Once connected, you can schedule cleanings, select cleaning modes, and monitor progress. The app also allows you to set no-go zones, review cleaning history, and receive maintenance alerts. Voice control integration with Amazon Alexa or Google Assistant is also accessible through the app. Regular updates ensure new features and improvements are added, enhancing your cleaning experience. Use the app to tailor your robot’s performance to your home’s unique needs.
Safety Considerations
Always follow safety guidelines when using your Shark robot vacuum. Avoid water exposure, hot surfaces, or flammable materials. Place on a stable, level surface and keep children and pets supervised.
Important Safety Precautions
Always read and follow the safety guidelines in this manual to ensure safe operation of your Shark robot vacuum. Keep the robot away from water, hot surfaces, or flammable materials. Avoid using damaged chargers or exposing the device to extreme temperatures. Ensure the robot is placed on a stable, level surface to prevent accidents. Regularly inspect and maintain the robot’s sensors and brushes to ensure proper function; Never attempt to modify or disassemble the device, as this may cause malfunctions. If an issue arises, refer to the troubleshooting section or contact customer support. Follow SharkNinja’s safety recommendations for optimal performance and longevity.
Preventing Damage to the Robot
To ensure longevity and optimal performance of your Shark robot vacuum, follow these care tips. Regularly clean the sensors, brushes, and charging contacts to prevent debris buildup. Avoid exposing the robot to extreme temperatures or moisture, as this may damage internal components. Use only authorized Shark replacement parts and accessories to maintain compatibility. Store the robot on a level, stable surface when not in use. Avoid placing rugs or carpets with fringes near stairs, as they may cause navigation issues. Regularly empty the dustbin and clean filters to prevent suction power loss. For advanced maintenance, use the SharkClean app to monitor and address potential issues promptly.
Warranty and Support
Your Shark robot vacuum is backed by a limited one-year warranty covering defects in materials and workmanship. Visit SharkNinja’s official website to register your product and access dedicated customer support for troubleshooting, repairs, and replacement parts.
Understanding the Warranty
The Shark robot vacuum warranty provides a one-year limited coverage for defects in materials and workmanship. This warranty ensures that any faulty components will be repaired or replaced free of charge during the coverage period. The warranty period starts from the date of purchase and is non-transferable. To validate the warranty, users must register their product on SharkNinja’s official website. The warranty does not cover damages resulting from misuse, neglect, or normal wear and tear. For detailed terms and conditions, refer to the warranty section in the product manual or contact Shark’s customer support. Proper maintenance and adherence to guidelines are essential to uphold warranty benefits.
Registering Your Product
Registering your Shark robot vacuum is a straightforward process that ensures warranty validation and access to exclusive support services. Visit the official SharkNinja website and navigate to the product registration page. Create an account or log in if you already have one. Enter your product details, including the model number and purchase date, found in the owner’s manual or on the product packaging. Once submitted, your registration is complete, and you’ll receive confirmation via email. This step is crucial for activating your warranty and accessing priority customer support. Regular updates and special offers may also be available to registered users. Registration helps SharkNinja provide tailored assistance and maintain quality service.
Contacting Customer Support
For assistance with your Shark robot vacuum, contact customer support through multiple channels. Visit the SharkNinja website and navigate to the support section, where you can access FAQs, troubleshooting guides, and live chat. You can also call their dedicated helpline at 1-888-228-5531 for direct assistance. Additionally, email support is available for less urgent inquiries. Registered users may receive priority service. Ensure you have your product model and serial number ready for efficient troubleshooting. SharkNinja also offers online resources, including user manuals and video tutorials, to help resolve common issues independently. Their support team is available to address any concerns, ensuring your Shark robot vacuum operates at its best.
The Shark robot vacuum is a powerful and intelligent cleaning solution designed to simplify home maintenance. With its advanced navigation, self-emptying capabilities, and voice control features, it offers a seamless and efficient cleaning experience. By following the guidelines in this manual, users can ensure optimal performance, troubleshoot common issues, and maintain their device for long-term use. Shark’s commitment to innovation and user-friendly design makes this robot vacuum an excellent choice for modern households. For any further assistance, Shark’s customer support and extensive online resources are readily available to help you get the most out of your investment.